Getting started

How to set up your Checker settings, one box at a time

These settings save and pre-populate every report, quote and invoice for you. Saving you hours in typing out over and over again. Get it right once and you never type your Gas Safe number again. This page walks you through the whole settings page from top to bottom, tells you what each box is for, and what to actually put in it.

Start your free trial →

Where settings live

On the phone app, tap the menu, then Settings, then Edit. On the web app at my.checker.app it’s the cog in the top right. Both screens are the same, so anything you change on one shows on the other within seconds.

Before you start: Nothing saves until you hit SAVE in the top right. Hit CANCEL and you lose the lot. Do it in one sitting, it takes about 5 minutes.

What’s on this page

Settings › Company Details

1Company details

This block prints on the top of every certificate, quote and invoice you send. Write it exactly how you want it to appear on paper.

Company Required

Put in: Enter your trading name, the one on the side of the van.

Don’t put “Ltd” in if it isn’t. Keep it under 40 characters or it wraps on the PDF. Example: ABC Plumbing

Company number Optional

Put in: Enter your Companies House registration number, e.g. GB1234567. If you don’t have one enter NA.

limited companies must show this on invoices, so fill it in if it applies.

Address (four lines) Required

Put in: Enter Line 1 street, line 2 area, line 3 town, line 4 postcode.

Enter the postcode on its own line, last. Keeps the header tidy on every document.

Phone Required

Put in: The number customers ring when they get your paperwork. Or want to book in a job.

Use the number you’ll actually answer. It’s a tap-to-call link on the PDF.

Email Required

Put in: Enter your email address your documents come from, e.g. support@checker.app.

Use your business email address to look super professional

Website Optional

Put in: Your Website address, if you have one e.g. https://checker.app.
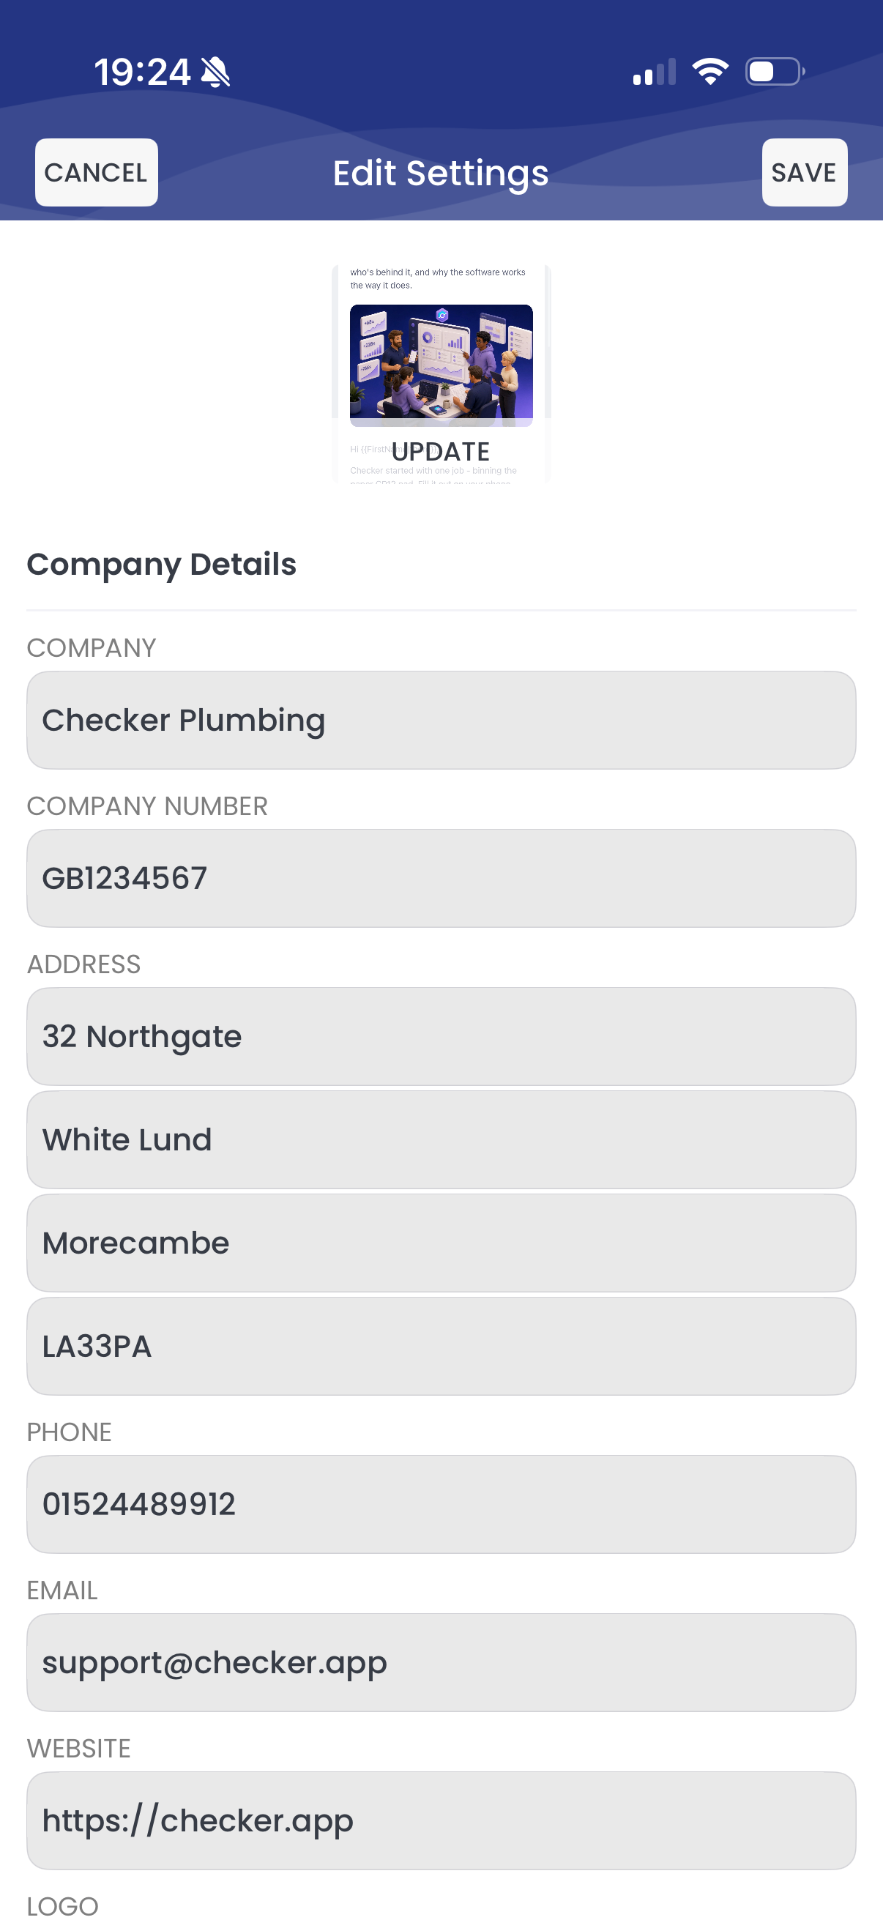
No website? Put your Facebook page in instead. Better than blank.
Checker app settings screen showing company details fields

Settings › Company Details

Settings › Logo and Engineer Details

2Logo and engineer details

PLACEHOLDER: Your logo and signature go on every document automatically. Do these two and your paperwork instantly stops looking like a photocopy from 2004.

Logo Optional

Put in: Tap UPDATE, pick a square PNG or JPG from your phone.

Square, or rectangular at least 500×500, plain background. Photos of a van don’t work. these embed onto every pdf record.

Name Required

Put in: The engineer’s name that signs off the report.

It must match the name on the Gas Safe card. No nicknames.

Gas Safe number Required

Put in: Enter your business’s Gas Safe registration number, e.g. 110098.

It’s the number on the front of the card. Get it wrong and the cert is invalid. Its the one that never changes

Gas engineer ID Required

Put in: This the individual licence card number, e.g. 454545454.

This one changes each year. Each engineer on your team enters their own. Never share one.

Signature Required

Put in: Tap UPDATE and sign with your finger on the screen.
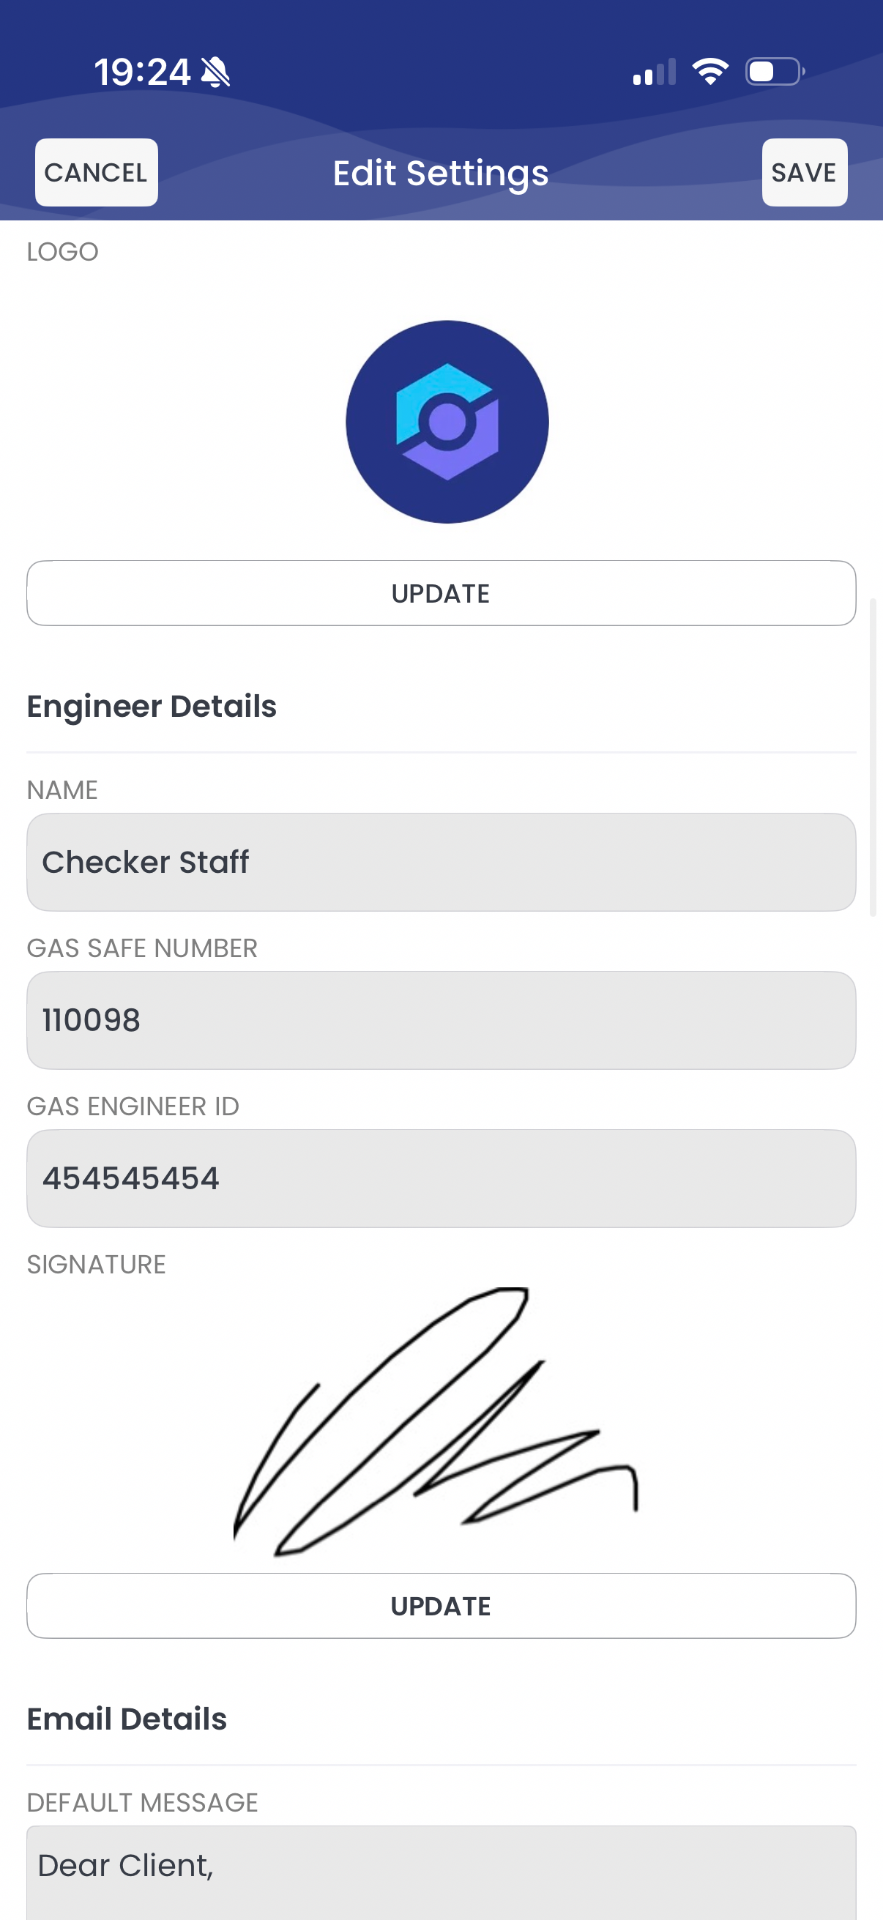
Sign big and slow. Turn the phone sideways if it helps. These super-impose onto every report when its completed.
Checker app settings screen showing logo upload and engineer details

Settings › Logo and Engineer Details

Settings › Email and File Settings

3Email details, file numbering and invoices

This decides what the customer reads when your PDF lands, and how your documents are numbered. Numbering matters most if you’re moving over from other software.

Default message Required

Put in: This is a short greeting that goes on every email, what’s attached, and how to get hold of you.

Write something friendly and generic. Don’t leave it blank, a friendly starter to an email he’s get through spam too.

Email CC Optional

Put in: Anyone who you want to get a visible copy, e.g. cc@checker.app.

Handy for a letting agent or office admin. The customer can see this address.

Email BCC Optional

Put in: Blind Carbon Copy – a hidden copy, usually to your own inbox or accountant.

BCC your accountant with invoices and you’ll never do a year-end scramble again.

Certificate prefix Optional

Put in: Two or three letters in front of every certificate number, e.g. CA.

Setting a prefix looks more professional and great for creating a proper serial numbering system.

Next certificate number Optional

Put in: This is where your numbering carries on from, e.g. 00123.

Moving from another app, carry on where you left off so nothing repeats.

Invoice prefix Optional

Put in: The letters in front of every invoice number, e.g. CAINV.
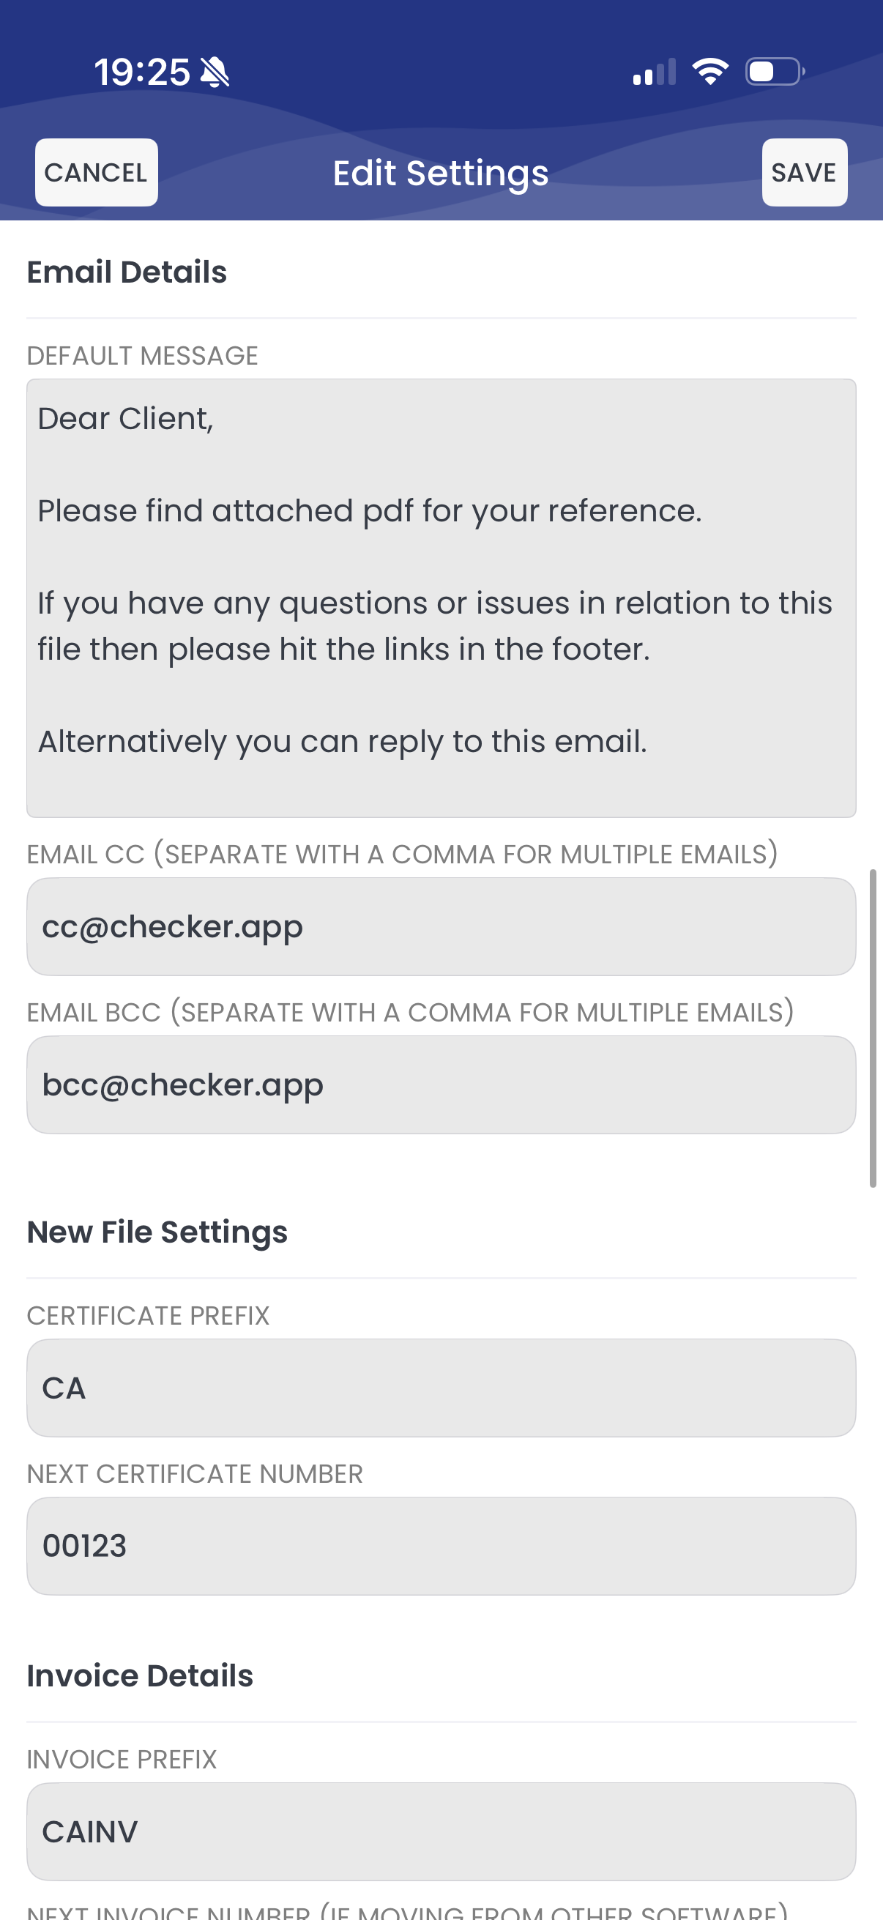
Keep invoice and certificate prefixes different so you can tell them apart at a glance. A decent prefix allows you to instantly spot who created the file. ie staff members initials
Checker app settings screen showing email details and file numbering

Settings › Email and File Settings

Settings › Invoice Details and Analyser

4Currency, VAT, payment terms and your analyser

The money settings and the bit that pairs your flue gas analyser. Get the toggles right and Checker does your VAT maths for you.

Next invoice number Optional

Put in: Where invoice numbering picks up, e.g. 32523.

This is the next invoice number you need the app to generate. all invoices after this will be perfectly numbered there after.

Currency Required

Put in: If you’re in Europe of America or the UK the invoicing still works… UK trades pick GBP.

Set it before you raise your first invoice, it doesn’t convert old ones.

VAT registered Toggle

Put in: Turn on if you’re VAT registered, off if you’re not.

If you turn vat registered because your smashing the numbers switch it on and the current vat rate will apply to invoices. DRC and different VAT rates can be handled during invoice creation.

Autofill invoice & quotes Do this

Put in: Leave it on unless you like typing.

It’s the single biggest time saver in the app. It will remember how much you charged last time you sold that service or part.

T&Cs on quotes & invoices Toggle

Put in: Switch it on if you want to be covered legally from bad payers, we have a catch all terms and conditions or you can paste your own.

It’s worth doing. It’s what you point at when someone argues about a deposit.

CIS member Toggle

Put in: On only if you’re registered under the Construction Industry Scheme.

Subcontracting for a builder? Usually yes. Domestic only? No.

Payment terms Required

Put in: Pick from the dropdown, e.g. 14 days.

7 or 14 days for domestic, 30 for commercial. Shorter terms get paid faster. Even better don’t wait at all.

Notes for invoices & quotes Do this

Put in: Best practise here is account number, sort code, and “use your invoice number as the reference”.

Double check the digits. This is the number one cause of “I’ve not been paid”.

Analyser type Gas

Put in: Which flue gas analyser you use, e.g. Kane 458.

We’ll let you know when its due for service we work with Kane who are top dog.

Serial number Gas

Put in: Add the analyser’s serial, e.g. 676666. Copy it off the back of the unit.

Update it the day you replace the analyser, not six months after.

Calibration serial & due Gas

Put in: The calibration certificate reference and its expiry date.
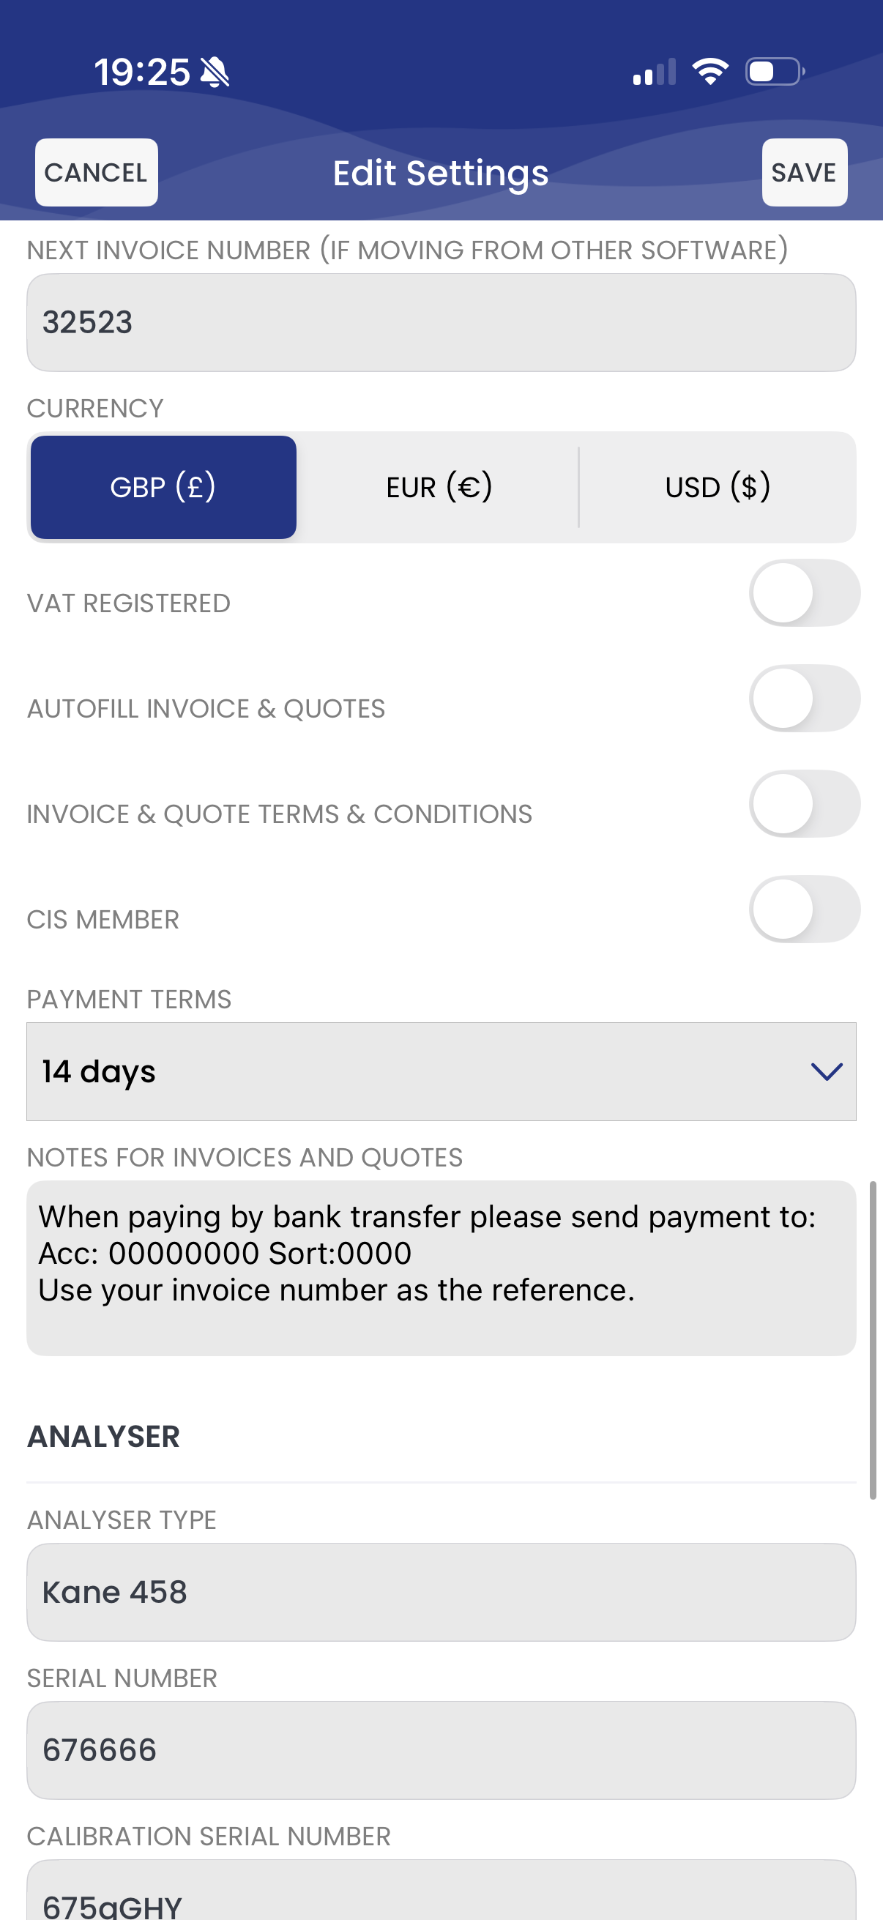
Set the date correctly and Checker warns you before it lapses. An out-of-date analyser voids your certs.
Checker app settings screen showing currency, VAT, payment terms and analyser settings

Settings › Invoice Details and Analyser

Settings › Oil and Electrical Details

5Oil and electrical registration details

PLACEHOLDER: Only fill these in if you do oil or electrical work. Leave them empty otherwise, they won’t print on anything.

Technician name (oil) Oil only

Put in: The name of the engineer that signs oil certificates, e.g. Checker Staff.

Match it to the OFTEC card exactly.

Technician reg number (oil) Oil only

Put in: Your personal OFTEC technician number, e.g. 01010110.

This is the one tied to you, not the business. Don’t mix them up.

Oil registration number Oil only

Put in: The business OFTEC registration, e.g. 02020202.

Check it against your latest OFTEC renewal letter.

Technician name (electrical) Electrical only

Put in: The name printed on electrical certificates.

Whoever is qualified to sign it off, not whoever owns the van.

Technician reg number (electrical) Electrical only

Put in: Your personal scheme number, e.g. NICEIC or NAPIT.

PLACEHOLDER: keep it current, schemes reissue numbers when you change body.

Electrical registration number Electrical only

Put in: The business’s electrical scheme registration, e.g. 0000001.
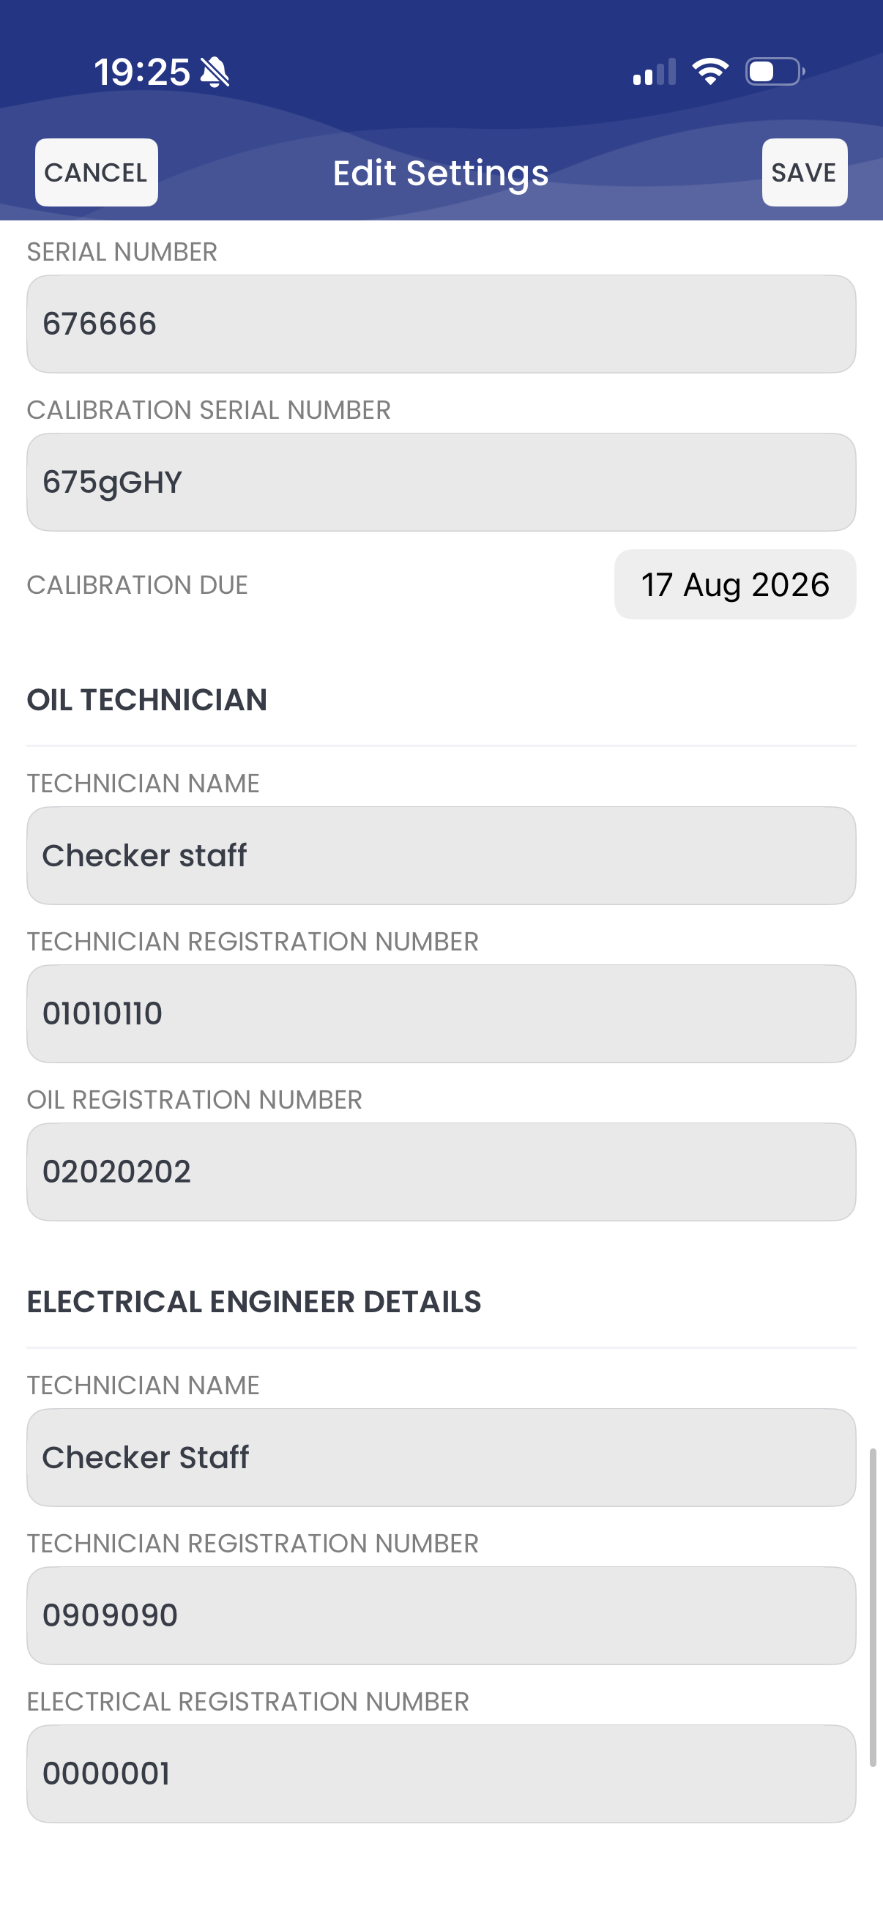
This one prints on EICRs and minor works certs, so get it right.
Checker app settings screen showing oil technician and electrical engineer registration details

Settings › Oil and Electrical Details

Common questions

Do I have to fill every box in?

PLACEHOLDER: No. Anything marked optional you can skip, and empty boxes simply don’t print.

If I change settings, do old certificates change too?

No. Anything already issued stays exactly as it was. Changes only affect new documents.

Does the web app have the same settings?

Yes, same screen, same boxes. Change it in one place and it syncs to the other.

Can each engineer have their own details?

Yes. Company details are shared, engineer details are per person.

I’ve hit save and nothing changed. Why?

Close and reopen the document you’re looking at. It picks up settings when it’s created.

Ten minutes now, saved for good

Fill settings in once and every certificate, quote and invoice after that fills itself in.

Start your free trial →